Upholstery tip #11 Most old cars I have worked on or driven have seat adjusting tracks that don't work. Either the seat is frozen in the right place for the driver, or he just got used to it! While the seats are out, let's restore the tracks. When taking the tracks off of the seat frame, be careful if there is a strong spring with stored energy. Release this before working. Next, check to see if the tracks use a series of large ball bearings or roller bearings to slide on. These type don't like to be sandblasted or glassbeaded without being completely disassembled (not for the faint of heart!) because it's very hard to get all of the grit out. I usually just degrease these, soak in PB BLASTER penetrating oil to dissolve rust, final wash with brake cleaner, re-lube, and wipe off the excess with a rag and more brake cleaner. Then you can paint them with either satin black or, to match the bare metal or galvanised finish, I use Rustoleum Stainless Steel spray paint. This stuff really looks the part, and it protects against rust. For the lubricant, the best I've found so far is Wurth's HHS 2000. It can get into the smallest crevice and then sets into a sticky grease. For the majority of seat tracks, those that just use a channel that slides on top of another channel attached to the floor, sandblast or glassbead them and blow out the grit. Wash with brake cleaner, blow out again, paint first and then lube with the HHS200. When the tracks are back under the seat, adjust the turnbuckle that operates the release for the opposite track until it's open with the adjuster lever closed, and then back it off until it just locks. This will allow both to come on as soon as you pull the lever. Check the long rod and turnbuckle in bench seats to see that it's strong enough to open both locks, but allows them to close too. Tie the rod loosely to the springs with wire ties or bent welding rod to keep it from sagging or bending under force. If the seat uses a big spring attached to the floor to pull the seat forward or back, put it on the seat first and clamp vise grips to the other loop. Then you can fish it through the floor bracket. If the tracks have threaded holes for bolting to the floorpan, tap them out, spray the HHS2000 on the threads and the bolts won't fight you while your lying on your back trying to put them in!
Upholstery tip #12 To fix plastic seat skirts and hinge covers that are cracked or even broken and missing pieces, I used a product called FUSOR epoxy. It came in two quart cans and you mix equal parts to make a stiff putty. After grinding the broken parts for adhesion, apply the epoxy and hold the pieces together with tape, clamps, or even hot melt glue until the epoxy hardens. Metal pieces can be laminated in to make it stronger. Then sand or grind down the repair (you can leave some for strength on the backside) until smooth. To refinish, you have three options: send out for re-covering by companys like Just Dashes, cover it yourself using contact cement and expanded vinyl which will stretch better than regular vinyl (be sure to use plenty of heat from a heat gun or hair dryer to soften the material), or spray the part with SEM Texture Coating. You can vary the pebble finish this gives to emulate vinyl grain. If it doesn't come out right the first time, it can be sanded down and re-sprayed. I have also used this as a flexible primer/surfacer to blend vinyl repairs on door panels and dashboards, because it can be wet sanded for a feathered edge.
Upholstery tip #13 How to make door panels: The easiest way to make new door panel boards is to cut a piece of OEM door panel board material (1/8" thick water resistant cardboard that comes either all black or all tan in color. Cowl board is almost always black on one side and tan on the other, 1/16" to 3/32" thick) to slightly larger size than the door. Then use two self-drilling "sems" screws (integral washer phillips screws about 5/8" long) spaced one on each end of the door to hold the board onto the inner metal panel of the door. Drill where the holes won't matter later. You may have to cut the panel for door handles and window cranks first. Find these by holding the board to the door and tap with a mallet. Then cut the smallest hole needed to clear the obstruction. Once the panel is screwed tight to the door, sharpen a pencil and trace around the inner structure of the door as close and accurately as you can. Then place a piece of carbon paper (remember that stuff?) in between the cardboard and the metal, ink side to the cardboard, and tap around the perimeter of the door where the clip holes are. You may have to repeat this step - that's what the screws are for - the panel will always be perfectly lined up when re-attached. Once you have good ink marks where the clip holes are you can mark the actual holes to be punched. These are offset so when you punch them and insert a new metal clip (and they are the ones labeled Chrysler clips) the shaft goes through the hole in the door. Hold a new clip against the panel over the ink mark and center the shaft with the circle. Mark the back edge of the clip (towards the inside of the door) with a line. Draw a new circle with this line bisecting it and cut out with a 5/16" punch. Now the clips will slide right into place and there is a little bit of adjustment for fit. Cut out the door panel with a utility knife about a 1/16" inside your lines for material allowance. Sand the edges smooth with woodworking sandpaper (60-80grit) and give a slight bevel or roundness to the edges so the door panel doesn't look like just a piece of cardboard ps-Don't forget the armrest screw holes! You can get these and any other hole from the original panel.
Upholstery tip #14 If you have original sun visors and the binding around the edge is just beginning to come loose, peel it back and apply a tiny amount of VLP or other vinyl mending cement. Hold the binding on with some masking tape until the glue dries. What you want to do is keep the binding in place before the stitches (which always deteriorate) break and the whole strip comes off. Re-binding sun visors is very difficult to do without the special sewing machine and never looks the same as original. If your sun visors need re-covering already and they aren't available new (or you want custom visors), you can make ones similar to Rolls Royce with or without stitching. First, take your old visors down to the masonite board and hinge unit. Make any repairs to this unit as needed. Then, open up and lay the unit's original covering on a large piece of cardstock, such as heavy posterboard or pizza-box type of cardboard. Trace around the old covering and cut out. Spray with glue (such as 3m #8088) and cover with your upholstery.Wrap the edges, glue down with contact cement and trim any excess that doesn't lay flat. Then you wrap the cover around the inner unit just like original and glue together the edges (like a clamshell) with contact cement. Just use the cement sparingly or you can re-activate the glue under the wrapped edges and nothing will stick. Now it's finished, or you can run a stitch close to the edge to really keep it together. They look pretty cool without the binding.
Upholstery tip # 15 When you choose vinyl for your interior, there are many kinds out there. First is the OEM remake vinyls from companies like Legendary. These are very good for matching the original grains and colors, but dye lots vary. I used some to repair a small section of a front seat and ended up replacing more than was bad just so the color difference wasn't as noticable (and this was black!). The vinyl seems to be of good weight and quality, and is the best for restorations.
When purchasing vinyl from other dealers for custom work, make sure it's automotive grade. The vinyls at the "rag shops" just can't handle the rigors of automobile seating and UV protection. The best vinyls are usually rated for -20 degree "cold crack", and after that most are rated -10 degree. Whether or not your interior will ever get that cold doesn't matter, it's just about the flexibility of the chemical composition of the vinyl. Most -20 deg. vinyl is listed for RV and snowmobile seating, so you know it's tough. The majority of vinyls you will actually want for your car will be of the -10 deg. variety. Companies like Spradling and Naugahyde have been making great vinyls for years. Dealers like Legendary, Bill Hirsch, Veteran and LeBaron Bonney (Model A Fords, etc.) have good supplies of odd ball colors used in old cars. Check all of the available charts, including foreign car vinyls like Mercedes and BMW. When covering interior parts, the thinnest vinyls (sometimes called "panel weight") have very little backing cloth on them, so they are light enough for vertical surfaces, hung headliners and for heat-sealed door panels. Thicker vinyls tend to melt through when heat sealing. Seats require "upholstery weight" vinyl to stand up to abuse. "Expanded" vinyl is on a cloth backing that stretches good in all directions, and is great for covering difficult parts. Vinyl for tops on cars is usually on what's called an "Osnaburg backing" which doesn't stretch and is very strong. I get this vinyl from Kee Auto Top and Legendary. There is very little to no use for unsupported vinyl (the kind with no cloth backing) in our cars.
The availability of NOS vinyls and cloth out there still amazes me The fact that this stuff has been squirreled away for 30-50 years and can be had for any price has allowed us to have factory fresh interiors where reproduction makers haven't had the demand yet. I did a 1963 Thunderbird that we were able to find a full original set of Turquoise Metallic cloth and vinyl seat upholstery covers from Original Auto Interiors in Michigan. They were rolled up for 33 years, smelled a little musty, but were stunning when installed on the restored seat foam!
There are a new series of vinyls coming out that mimic leather and suede. This is done with urethanes, collagen and plasticizers. Plasticizers are the chemicals that evaporate from old vinyl, causing it to become tacky, slimey, and eventually brittle when there's not enough left in the vinyl. Convertible rear windows are an example of this. The plasticizers are added to make them fold over and over without cracking. Then, when the sun has baked all of it away, the windows yellow and crack. Companies are now adding collagen and urethanes to vinyl and the results are amazing. They are good replacements for leather. But the prices per yard triple or quadruple those of regular vinyl. But, compared to leather where you have much more waste when cutting usable pieces from the hide, you can use all of the vinyl yardage with no waste.
The suedes that have become available are actually a polyurethane cloth, woven into microfiber backing. They claim to be cleanable by machine washing (try to fit your seat in there!) or by drycleaning methods. This is much better than real suede, which, when I called a tannery and asked how to clean a suede kick panel that was kicked by a shoe, they told me to replace the piece!
Upholstery mini-tip #16 Door Pulls on 70 Chryslers It's been awhile since I recovered these type of door pulls, but I recall wishing I had good ones to dye (always the best for a factory look) but they can be done. I took the old cracked covering off and reused the inner base. I sewed new vinyl to the board next to both sides of the "bump" and then wrapped this around the metal strap. I glued the flaps together on the back where you can't see them by first wrapping them around and marking the excess material to be removed. I cut the vinyl (that was going to be on top of the lap joint) at an angle with a new razor blade against a ruler to keep the transition minimal and glued the flaps with contact cement. Then I ran a line of vinyl mending adhesive ( like VLP ) across the joint to melt it in. The ends finished under the chrome molding blocks attached to the door panel.
Upholstery tip #17 An easy way to make pleats for seats or panels is the "pinched pleats" method. To do this you need either commercially available sew-foam with a cloth backing, or make your own with foam and an old bedsheet or similar material spray-glued to the back.
First select the thickness of the foam you need. Door panels and the rear window shelf can use 1/8" - 1/4" thick foam sheet, while seats need at least 1/2" thick for proper pleats. Cut a piece of foam and a piece of upholstery material large enough for the project. You need to add extra length to both to allow for sewing allowances and the "take-up" each pleat consumes as it is sewn. Make test sample pieces that will allow you to sew at least 3 pleats to gauge how much extra you need, which varies with foam thickness and sewing "pinch". An example of "take-up" is this:
1/2" foam + leather or vinyl of about 1/32" thickness, marked out, sewn down and folded over at 4 5/8" increments, and sewn with a 3/16" seam allowance = perfect 4" pleats
You can see that instead of 4 inch pleats across the width of the seat, you need to allow enough material for 4 5/8" pleats across. This adds up to over 3" extra material for just 5 pleats. So calculate everything before starting. There will be a lot of trial and error, but use scrap until you are confident in your measurements.
To layout the pleats, you mark the larger dimensions on the face of the material (pencil for light materials, white or similar pencil/markers for dark. Please resist the urge to use ballpoint pen or Sharpie Markers as these will stain or bleed through your material Lay the marked material onto the foam and stitch down right on top of your lines. When all of the lines are sewn, fold the first pleat over on the line face to face and stitch the backside of the foam together leaving a "tab" of at least 1/8" (we use a fence or stop mounted on the sewing machine to keep the selvage even. It's easy to sew straight - just put the seam against the stop, set it 1/8"-3/16" away from the needle, and sew away!) What this does is "pinch" the material together and sews the marks down into the pleat, where they can't be seen. It also makes all of the pleats folded the same direction so wear is even (as opposed to the old way where the material is folded and then laid onto the backing. This makes all the pleats "directional", and they wear in one direction worse than the other) The pleats come out straighter and, if you don't leave too much of a "tab" or trim it off close to the stitches, the upholstery will lay nice and flat
Upholstery tip #18 An easy way to carpet the trunk of your car is to use the new style of carpet that is needle-punched and has little or no backing to it. These are available as FOSS or Dorsett brands and have a texture like trunk carpets in your new car. They can bend much easier than backed carpet, so you can do curved surfaces such as wheelwells.
Make a pattern from cheap vinyl (laid face down so you can draw on the cloth side) or from heavy butcher's brown paper taped together. Then cut out your pattern and re-fit to see if the carpet will be where you wanted it. Pay attention to overlaps and make the wheelwell carpets fit under the main floor mat for a clean installation. Cut the slots for the jack and spare tire areas in your pattern (you don't have to be perfect here) and, once the pattern lays tight to the floor, tape pieces down around the protrusions to clean up the slots. This is a fast & easy way to get the right holes. Once the main floor is done, take it out and climb into the trunk to do the wheelwells. Lay pattern material on the metal, cut holes in the surface to tape it down or spray some dots of adhesive to stick it down. Mark out where it needs to be cut and sewn together to make a bowl shape, and slot around the hinge supports for clearance. Cut small snips to allow the area at the base of the wheelwells to fan out (make sure this is covered by the floor mat) and they will conform nicely.
Lay the pattern on the carpet and mark it with chalk that you sharpened to a point. Cut it out, leaving a little extra for final trimming in the car. This carpet can be sewn on a home machine (give yourself a 1/2 inch selvage when sewing, this can be glued flat when installing the pieces), but I wouldn't sew the wheelwells to the main floormat. These need to be glued in first so you can cover the edges with the main mat.
Resist the urge to carpet the insides of the quarterpanels, as the factory undercoat won't allow the glue to stick, and moisture will condense into the carpet from the temperature difference between the inner & outer sheetmetal. This is why the factory used panelboard to box in the sides. But this makes the trunk smaller, and there just isn't many places on a later C body to attach them with clips or screws.
Glue the carpet down with a few small sprays of 3M General Purpose Spray Adhesive (# 8081 I think) so if you need to remove it it won't pull apart. Check your carpet for wetness if your trunk leaks and vacuum it so the floor doesn't rust - the carpet won't be affected by water or oil and can be cleaned with mineral spirits or soap & water.
Upholstery Tip #19- To repair pulled away armrests and cracks in dashpads, or anything else that is molded vinyl over a foam base, I use PL polyurethane construction adhesive. It really sticks and holds up to heat, plus it wets it's way into the foam for great grip. Just wrap the part with that saran-wrap style of packing tape that sticks only to itself:
Clamp the part together with the plastic wrap.
When done you can dye the vinyl and any exposed glue with SEM paint.
You can also glue cracks back together in dashpads if you get the glue under the vinyl surface as well as the broken foam. You will have to use something like duct tape to pull the crack together untill the glue sets:
This cracked 62 300/NYKR dash was cracked apart 1/4", but was soft enough to close completely. Some dashes will be too hard. In this case you will have to do a different type of repair with flexible fillers.
Just be sure to wipe up smears with mineral spirits before the glue sets (it also grows a little, so keep the cracks tight to stop the spread of glue) This kind of glue uses moisture to cure. Most of the time the foam will have some in it. If it is particularly dry, you can put a couple of drops of water in before glueing.
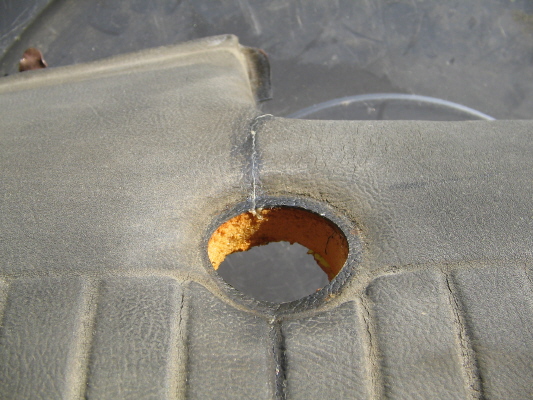
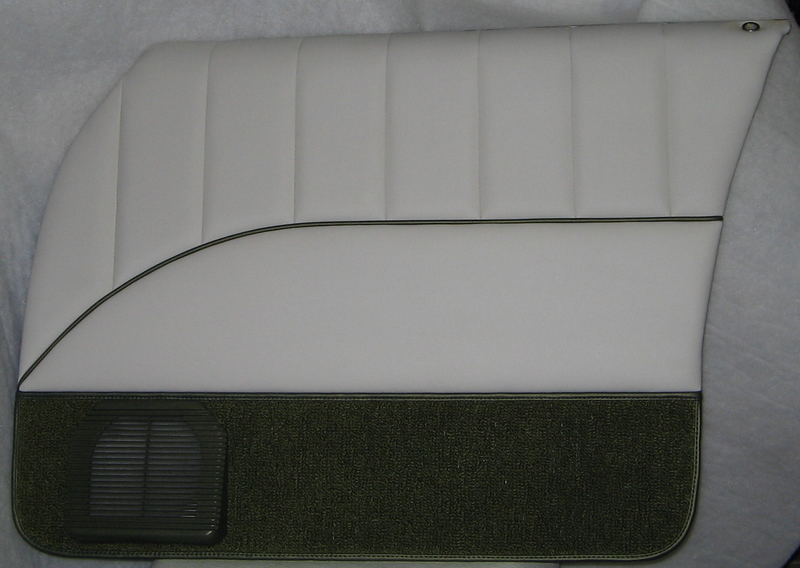
Upholstery Tip #20 - Polaraco Door Panel Here's a pic of Steve's Polaraco door panel for those who haven't seen it....
It is a new door panelboard with the original metal top re-attached. I removed it from the old masonite panel (after scribing it's exact location for re-assembly) and straightened out the punched holes that get peened over through the board (I used needlenose pliers for this). After making a new board from OEM style tan panelboard, I put a coat of contact adhesive on both pieces and lined up the scribe marks. With a block of steel underneath, I hammered over these punches until the board was tightly held to the sheetmetal top. After the glue set up, the panel was really strong.
I had cut the window fuzzy strip off by grinding the staples off on the backside with a cutoff wheel tool. Then the staples came out easy. These strips were good and had chrome edges on them (the Monaco had it, the Polara didn't) so we re-used them by drilling 3/32" holes and screwing them on with countersunk flat head phillips screws that buried themselves in the strips. Anything sticking out could scratch the glass, so make sure they go deep.
The top section is 1/2" foam with muslin backing. I drew lines on it exactly 4 1/8" apart as this would be the finished size of the pleats. Then I cut a piece of leather soft vinyl bigger than the foam by about 5 inches. On the reverse side I marked out a grid of similar lines but these were 4 5/8" apart. This was to allow for the pleat's puff and for a 3/16" sewing allowance. The vinyl was folded over face to face on the first line (left side of vinyl), and the pencil line was placed on the first pencil line on the left side of the foam. I stitched this down to the foam 3/16" in from the edge and repeated this across the panel from left to right. Each stitching closes the pleat and hides the 3/16" allowance from sight. These are called "hidden pleats" and are the kind most often used on antique upholstery. "Pinched pleats" are when you lay the vinyl on the foam, draw the grid lines on top, sew down these lines to the foam, and then fold each pleat over face to face and stitch the 3/16" allowance on the bottom of the foam to trap the materials into pleats. I didn't do that on the doors because the first method results in flatter panels.
The finished pleats were glued to the door (line up everything to a drawn pattern on the door panel), the excess foam laying over the edges was sliced off leaving only the vinyl to wrap...makes a nice clean edge.
The second panel was another 1/8" panelboard cut to shape. I installed tacking strips normally used on couches. These are 1/2" wide sheetmetal with many sharp points standing up that will go through holes drilled in the main panel to be hammered over. I covered this panel with sandable landau foam. The edges were sanded to a rolled edge with 80 grit sandpaper, covered with a light layer of dacron, and then covered with vinyl. I applied a sewn green pipng to the edge( after cutting off one leg of the piping next to the stitching to thin it out) and put the panel on the door. Hammering down the spikes was hard, but I pushed down next to each one with the handle of a hammer to allow most of the spike to lay over.
The carpet panel was made by cutting a piece larger than the area making sure the nap of the carpet was facing down on all (for color match and ease of cleaning) and making the edge next to the middle panel straight with a razor cut and a ruler. Then I stapled it to the board, turned it over and marked the bottom edge of the door onto the back of the carpeting. I cut this out about 1/16" inboard to allow for squish when the carpet was bound. When I bound the carpet, I also topstitched it but this is not necessary... most cars have un-topstitched binding. The top binding went on over the ends of the lower binding, this was wrapped and glued first, and then the carpet was glued to the door. Make sure the binding is straight and tight to the middle panel edge. A strip of green vinyl under that would be a good insurance to keep from seeing tan cardboard between the two.
The final step was to wrap the lower binding around the bottom of the door panel and glue it. Also, several hours were spent finishing off the edges, the ends of the middle panel and the green piping's ends (cut out the inner core to keep it flat on the edge of the doors) and installing the clips and new lock knob grommets, which are available from the HELP line of replacement parts.
All Rights Reserved 2006-2021.
Render time: 0.0160 sec, 0.0032 of that for queries. DB queries: 29.